When I started writing Clojure, I couldn’t memorize the difference between
conj and cons and always used one instead of the another. Their name are
similar, but cons is used to add an element at the beginning of a vector,
while conj is used to add an element at the end of it. How can one memorize
this? I found a mnemonic trick over the time that helps me remember this. Here
is it:
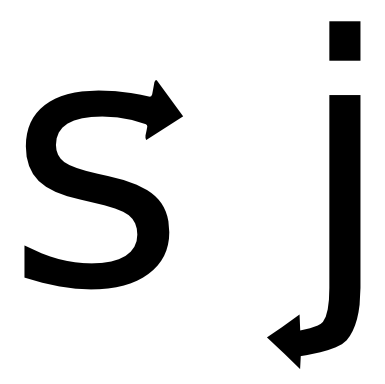
The trick is to look at the last letter of each function, s and j. As shown
in the image below, the s of cons shows the right, while the j of
conj shows the left.
This means that cons pushes elements from the left to the right, that is,
at the beginning of a vector. conj, on the other hand, pushes elements
from the right to the left, which is at the end of a vector. That’s it.
Once you see this in your head, you’ll never forget the difference between
cons and conj on a vector.
When plotting with gnuplot-py on OSX, I got an annoying warning
saying that terminal aqua is unknown or ambiguous, even when I use a
different terminal (e.g. postscript). This terminal doesn’t exist on my
Gnuplot installation (4.6.3). In fact, gnuplot-pyuses slightly
different files depending on your platform. OSX’s one is exactly the same as
other UNIX-flavored OSes but its default terminal is aqua. There are two ways
to fix the warning, a hacky one I used before this blog post, and a clean one I
discovered while writting this post. Hope this help!
The hacky way
Since OSX’s Gnuplot file is the same as Linux’s one apart from its default
term, we just need to tell gnuplot-py we’re on Linux:
importsys_platform=sys.platform# save the normal sys.platform valueif_platform=='darwin':sys.platform='linux'# replace it with 'linux'importGnuplot,Gnuplot.funcutils# import Gnuplotsys.platform=_platform# restore it
It temporarily changes sys.platform value, which gnuplot-pyis relying on,
to "linux", import Gnuplot and then restore it back to its previous value
("darwin").
The clean way
In fact there’s a much cleaner way to fix the warning. The default terminal is
stored in GnuplotOpts.default_term, so we just need to change
it to another value to fix the warning:
It’s clear: the second line is pretty explicit: we change default_term to
'x11'. We don’t even need to add a comment.
It’s more maintainable: if OSX’s gnuplot-py interface change in the
future, this piece of code won’t break compatibility while the hacky way
will prevent our code to use the new interface.
It’s shorter: one line versus five ones. It’s really easier to introduce
bugs when using five lines instead of just one.
When plotting with gnuplot-py on OSX, I got an annoying warning
saying that terminal aqua is unknown or ambiguous, even when I use a
different terminal (e.g. postscript). This terminal doesn’t exist on my
Gnuplot installation (4.6.3). In fact, gnuplot-pyuses slightly
different files depending on your platform. OSX’s one is exactly the same as
other UNIX-flavored OSes but its default terminal is aqua. There are two ways
to fix the warning, a hacky one I used before this blog post, and a clean one I
discovered while writting this post. Hope this help!
The hacky way
Since OSX’s Gnuplot file is the same as Linux’s one apart from its default
term, we just need to tell gnuplot-py we’re on Linux:
12345678
importsys_platform=sys.platform# save the normal sys.platform valueif_platform=='darwin':sys.platform='linux'# replace it with 'linux'importGnuplot,Gnuplot.funcutils# import Gnuplotsys.platform=_platform# restore it
It temporarily changes sys.platform value, which gnuplot-pyis relying on,
to "linux", import Gnuplot and then restore it back to its previous value
("darwin").
The clean way
In fact there’s a much cleaner way to fix the warning. The default terminal is
stored in GnuplotOpts.default_term, so we just need to change
it to another value to fix the warning:
It’s clear: the second line is pretty explicit: we change default_term to
'x11'. We don’t even need to add a comment.
It’s more maintainable: if OSX’s gnuplot-py interface change in the
future, this piece of code won’t break compatibility while the hacky way
will prevent our code to use the new interface.
It’s shorter: one line versus five ones. It’s really easier to introduce
bugs when using five lines instead of just one.
Coveralls is a service that keep track of your tests coverage
for you. It can notifies you when your coverage decreases under a custom
threshold, and their bot comments on pull requests to report their tests
coverage. Like Travis-CI, it allows you to add a badge to your readme with
an up-to-date tests coverage percentage.
If you already test your GitHub projects with a CI server like Travis, it’s
very easy to add Coveralls to your workflow. Unfortunately, they have a library
for Ruby, a couple user-provided libraries for other languages such as PHP,
Java and Python, but nothing for Clojure. Fortunately, they provide an API for
unsupported languages like Clojure. Here is how to use it.
Cloverage
Cloverage is a Clojure library and a Leiningen plugin to get
form-level tests coverage of your projects. It’s dead easy to use and generates
HTML reports for you as well as some other formats.
Use lein cloverage to run your tests and generate various reports. You can
specify which Cloverage version you want to use with CLOVERAGE_VERSION. The
latest stable one is 1.0.3, but we’ll need to use 1.0.4-SNAPSHOT for this
article:
CLOVERAGE_VERSION=1.0.4-SNAPSHOT lein cloverage
Coveralls
If you don’t already use it, signup on Coveralls using your GitHub account.
Then, click on “Add Repo”, find your repo in the list and activate it. That’s
all you have to do on their website for now.
Travis CI
You now need to custom your builds on Travis to use Coveralls. We’ll do it in a
Bash script, so add this to your .travis.yml:
after_script:-bash -ex test/coveralls.sh
This tells Travis to run test/coveralls.sh after each build. We use Bash
options -e and -x to respectively stop the script at the first failure and
print each command.
Now edit test/coveralls.sh and add the following content:
It’ll run Cloverage and output reports in cov (use another name if you
prefer), using a report for Coveralls. This generates a coveralls.json file
which can then be sent to their API. That’s what we do on the next line, using
cURL.
That’s all! You can now push on GitHub, Travis will run your tests and send
their tests coverage to Coveralls.
Caveats
Coveralls doesn’t support partial-line tests coverage, so we’re cheating a
little bit here using hits count. A line that it never covered has 0 hits, one
that is partially covered has one hit, and a fully covered one has two hits.
There’s an open issue regarding this.